
You have finished trimming a short video, but the spoken message disappears when someone watches with the sound off. CapCut auto captions can put that message on screen in a few steps. The first draft still needs a close look: a misheard name, a late caption, or text over an important part of the frame can make the finished video harder to follow.
The process is straightforward: generate a first draft, correct the words and timing, then check the exported video with sound off. Captions also let viewers follow a spoken point when they cannot turn on audio.
How to Add Auto Captions in CapCut on Mobile, Desktop, and Web
The basic process is the same on each platform: open your video, choose Auto Captions, select the spoken language, and generate a caption track. The paths below follow CapCut's help instructions as checked in September 2026. Menu names can shift between app versions, so check Text if your editor does not show Captions.
Before you start, play the clip once and make sure the speaker is easy to hear. If music covers the voice, lower it while generating captions when your project allows. You can bring the music back for the final video.
If your source is a long recording, pick the shorter clip you want to post before adding captions. For that separate preparation step, VideoTube's AI clip maker can help you find moments worth cutting.
Add Auto Captions in the CapCut Mobile App
-
Open an existing project or start a new one and add your video.
-
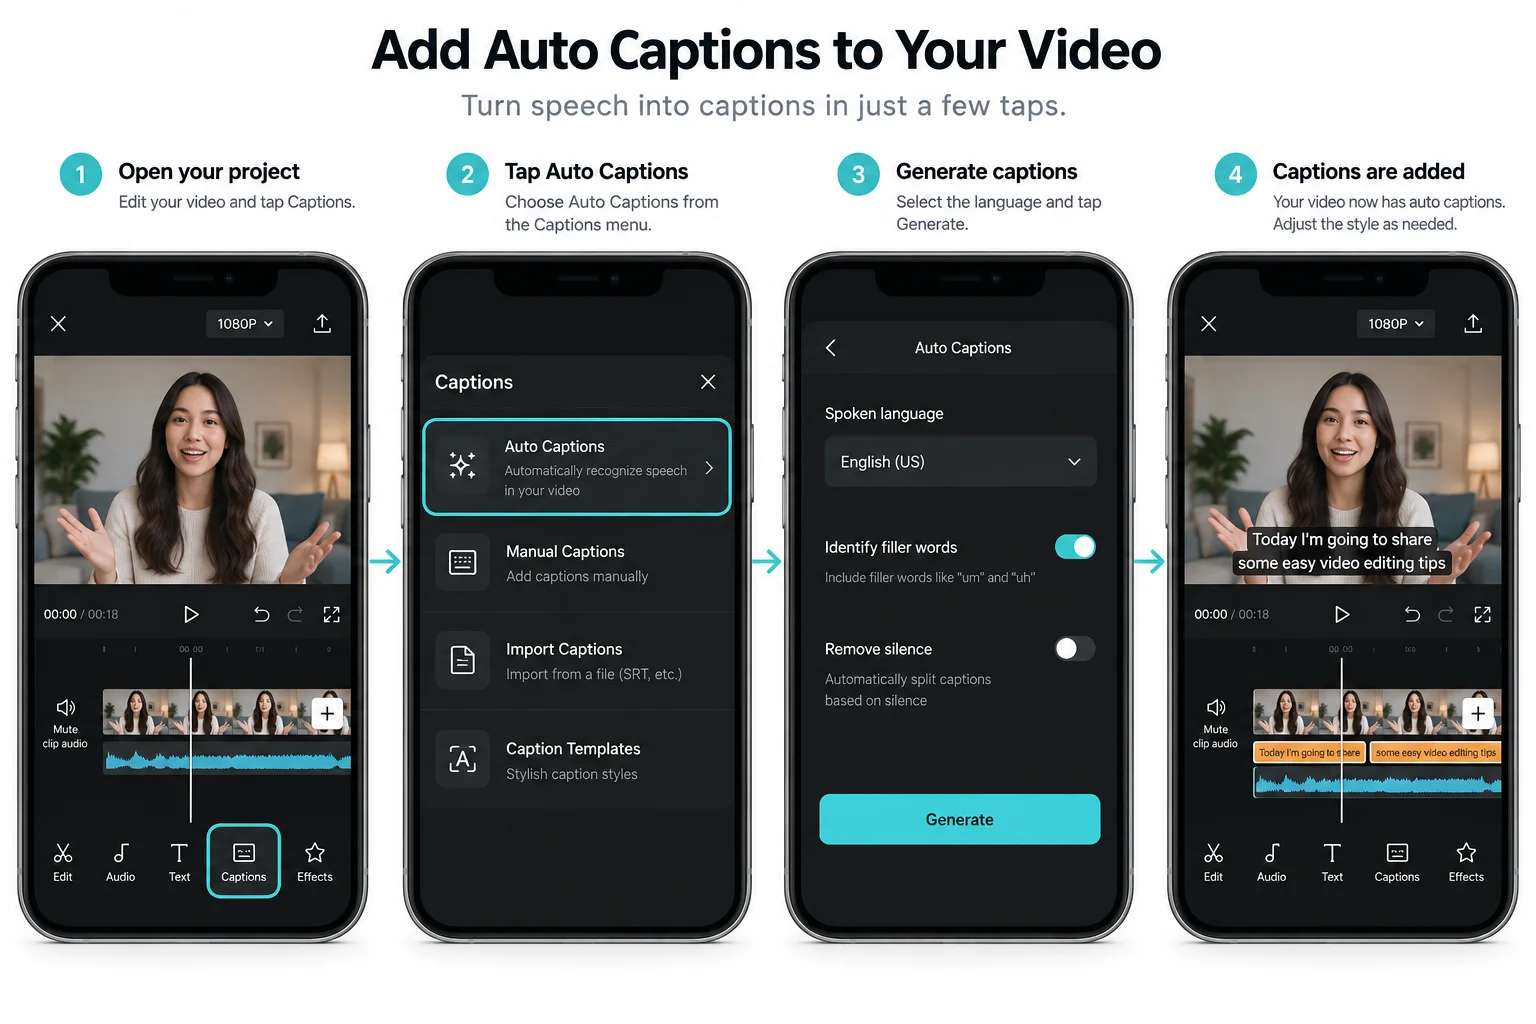
In the bottom menu, tap Captions → Auto Captions.
-
Choose the language spoken in your video and start generation.
-
Play the result with sound on. Tap a caption to correct its text or appearance.
Do not rush to export as soon as the captions appear. A quick read through the full clip usually catches the errors viewers will notice first.
Add Auto Captions in CapCut Desktop
-
Import the video and place it on the timeline.
-
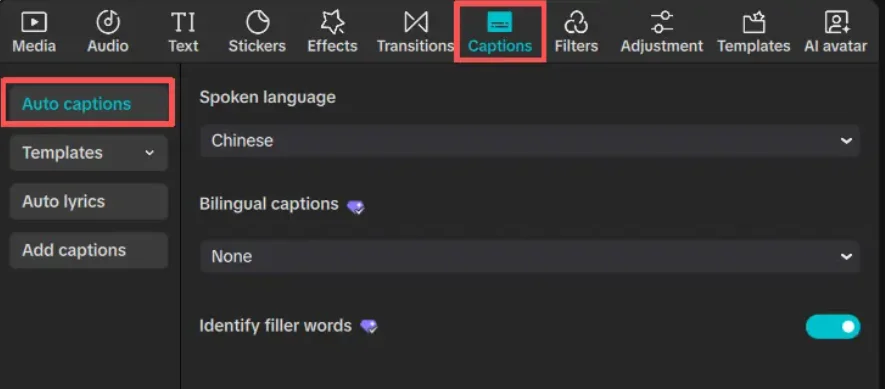
In the left toolbar, open Captions → Auto Captions.
-
Select the audio source and spoken language if CapCut asks for them, then click Generate.
-
Review the caption blocks on the timeline. Select a block to edit its words, timing, or style.
If your project has separate voice and music tracks and CapCut shows an audio-source option, choose the track with the speech. You can adjust individual caption blocks directly on the desktop timeline.
Add Auto Captions in CapCut Web
-
Open a project in the browser and upload your video.
-
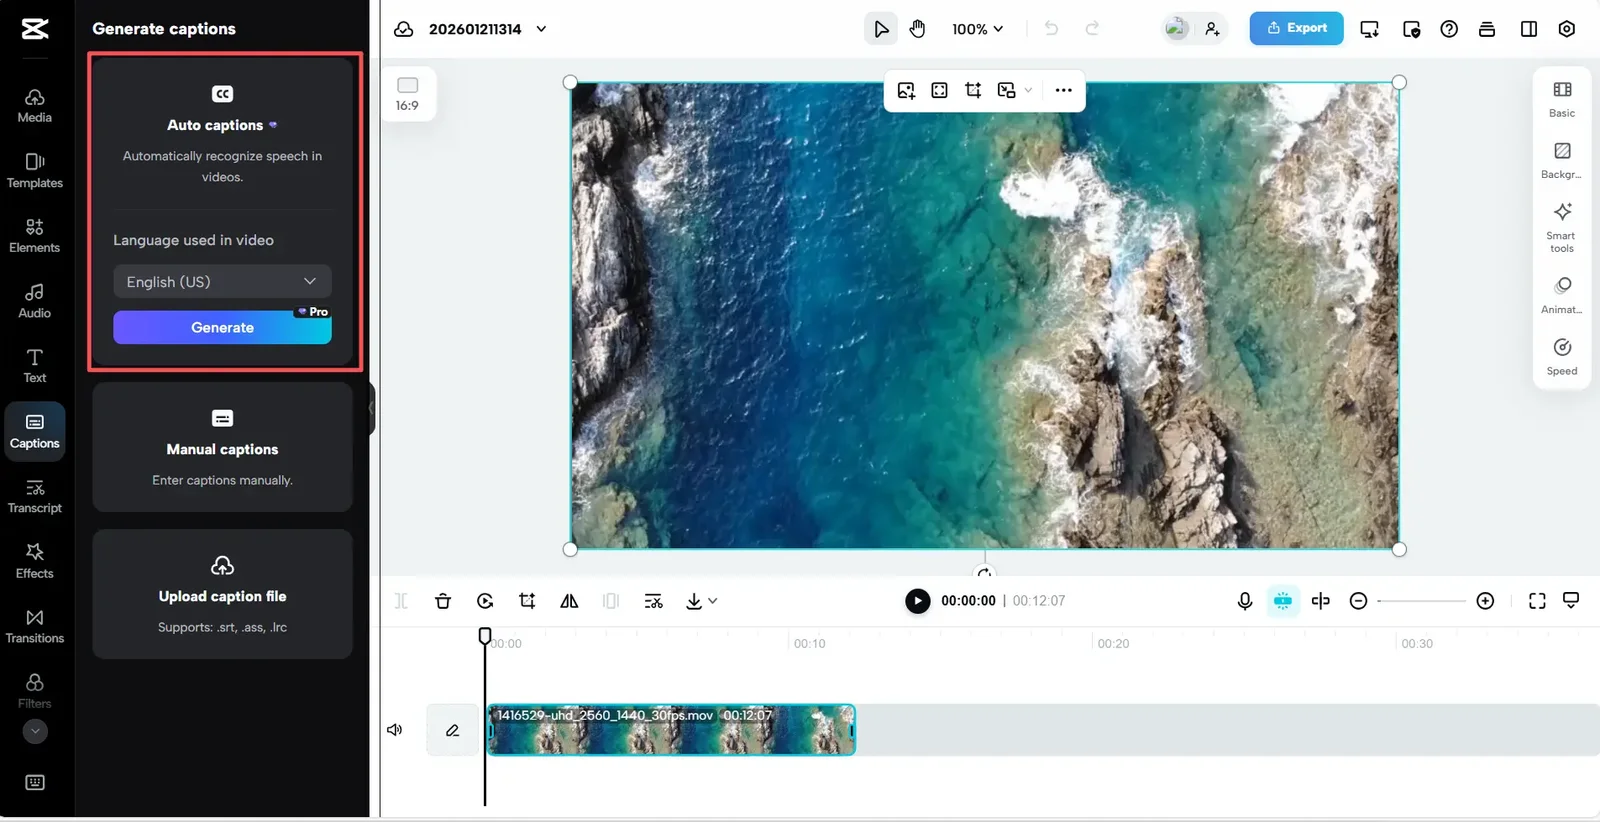
In the left sidebar, open Captions → Auto Captions.
-
Set the spoken language and generate the text.
-
Read the caption draft while the video plays, then correct any errors before export.
The web editor keeps this workflow in the browser, while the desktop editor gives you a larger timeline for reviewing each caption block. On all three platforms, check that the text matches what the speaker actually says.
How to Edit and Style CapCut Auto Captions
Generated captions save typing, but they are only a starting point. Work through the video once for accuracy and once for how the text looks on screen.
Correct Misheard Words and Punctuation
Pay special attention to names, product terms, numbers, and short words that change the meaning of a sentence. If a speaker says “fifteen” but the caption says “fifty,” the error matters more than a missing comma. Tap or click the affected caption, replace the text, and replay that moment to confirm it still fits the speech.
Keep punctuation simple. A short video rarely needs every pause marked with a comma. Break a long sentence where the speaker naturally pauses so viewers can read it without racing the next line.
Adjust Caption Timing and Line Breaks
Play the clip with the sound on. Does each line appear as the speaker begins the phrase? Does it disappear before the next point starts? Move or trim the caption block when it is too early or late. Split a crowded line into shorter pieces if your editor offers that control.
If you make another cut to the video after generating captions, check the affected section again. Moving footage or audio can change where the text belongs.
Keep Captions Readable on a Small Screen
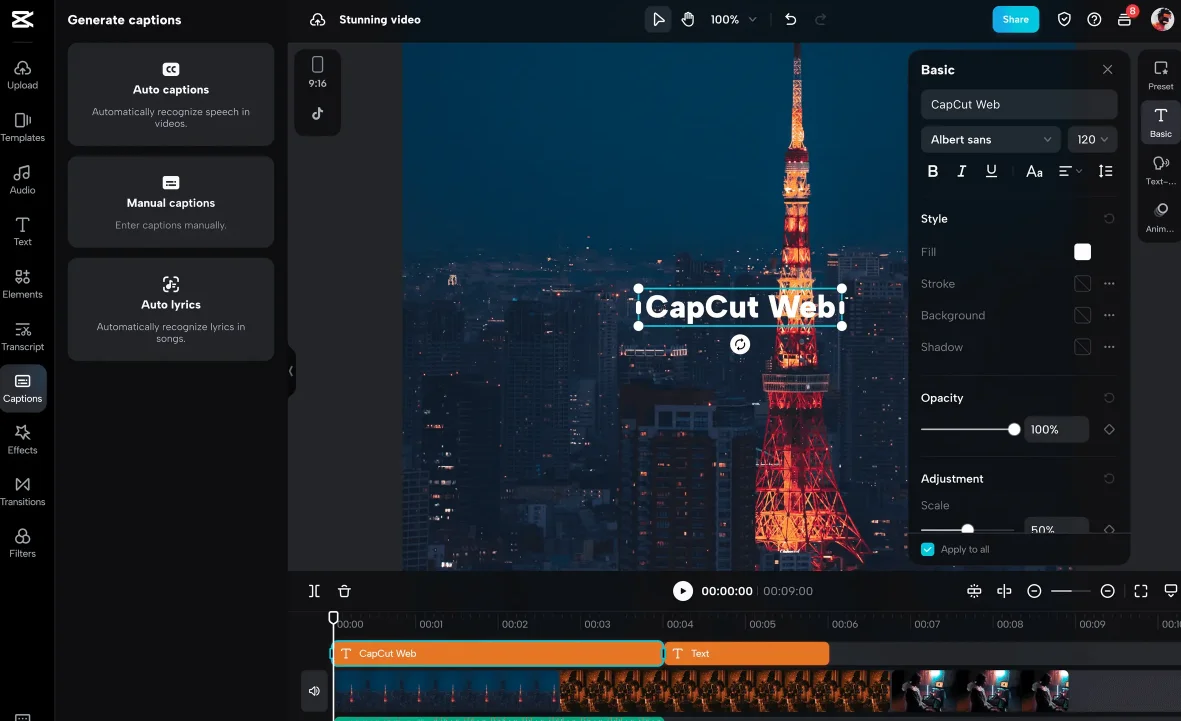
Choose a font that stays clear on a phone, then give the text enough contrast against both bright and dark shots. An outline or background can help when the footage changes quickly. Keep captions clear of faces, product details, and interface elements that viewers need to see.
Use one consistent style unless a change serves the message. Animation can draw attention, but if every word moves, reading becomes work. Preview a few busy frames before applying a style across the whole video.
These edits apply to captions inside a CapCut project. If your video has already been exported and only needs on-screen text, you can add captions to the finished video online with VideoTube instead.

How to Fix CapCut Auto Caption Problems
Some issues need more than a quick text edit. The right fix depends on whether captions failed to appear, lost sync, or picked up inconsistent styling.
Auto Captions Won't Generate
First, check that the video has an audible speech track and that the selected language matches the speaker. Then check your internet connection and try again. CapCut's caption generation may rely on online processing, so an unstable connection can interrupt it. If the option itself is missing or keeps failing, update the app or try the same clip in another CapCut editor.
For a longer recording, test a short section. If that works, the problem may be tied to a particular part of the original file rather than every video you caption.
Captions Are Out of Sync with the Audio
Find where the mismatch begins. If every caption is early or late by about the same amount, adjust the caption timing against the spoken audio. If the gap grows or starts after a cut, inspect that section of the timeline before moving every line. A changed clip, shifted audio track, or extra pause may be the cause.
After a substantial edit, generating captions again from the finished cut can be cleaner than repairing many displaced blocks one by one. Always replay the opening, middle, and end before export.
Caption Styles Don't Apply to All Lines
Select a caption that still looks different and check whether it belongs to the same auto-caption track as the others. Manually added text and imported captions may not respond to the same Apply to All setting. Also check whether a line was split or restyled after you applied the shared design. Reset that line's style if needed, then apply the chosen look again and preview several sections.
How to Export a CapCut Video with Captions
The goal is a video that shows the right words at the right moment. Check the project before export, then inspect the exported file itself.
Make a Final Check Before Export
Play the complete timeline. Confirm that no captions cover an important visual, no line ends halfway through a phrase, and the last sentence stays visible long enough to read. Check the beginning and end especially: these are easy places to miss a caption when trimming a clip.
Click Export, choose the video export option, and save the finished file with the captions visible. If CapCut also offers a separate caption-file export, do not select that in place of the video. The exact export controls can differ by platform and version.
Check the Exported Video with Sound Off
Open the saved video outside the editor and watch it on the kind of screen your audience will use. With sound off, can you follow the message from start to finish? Check the small text, quick cuts, and shots with a bright or busy background. Then replay any questionable moment with sound on to confirm the wording and timing.
This last pass catches problems that are easy to miss in the editing preview. If something is wrong, change the original project and export the video again.
Another Workflow: Add Captions to a Finished Video with VideoTube
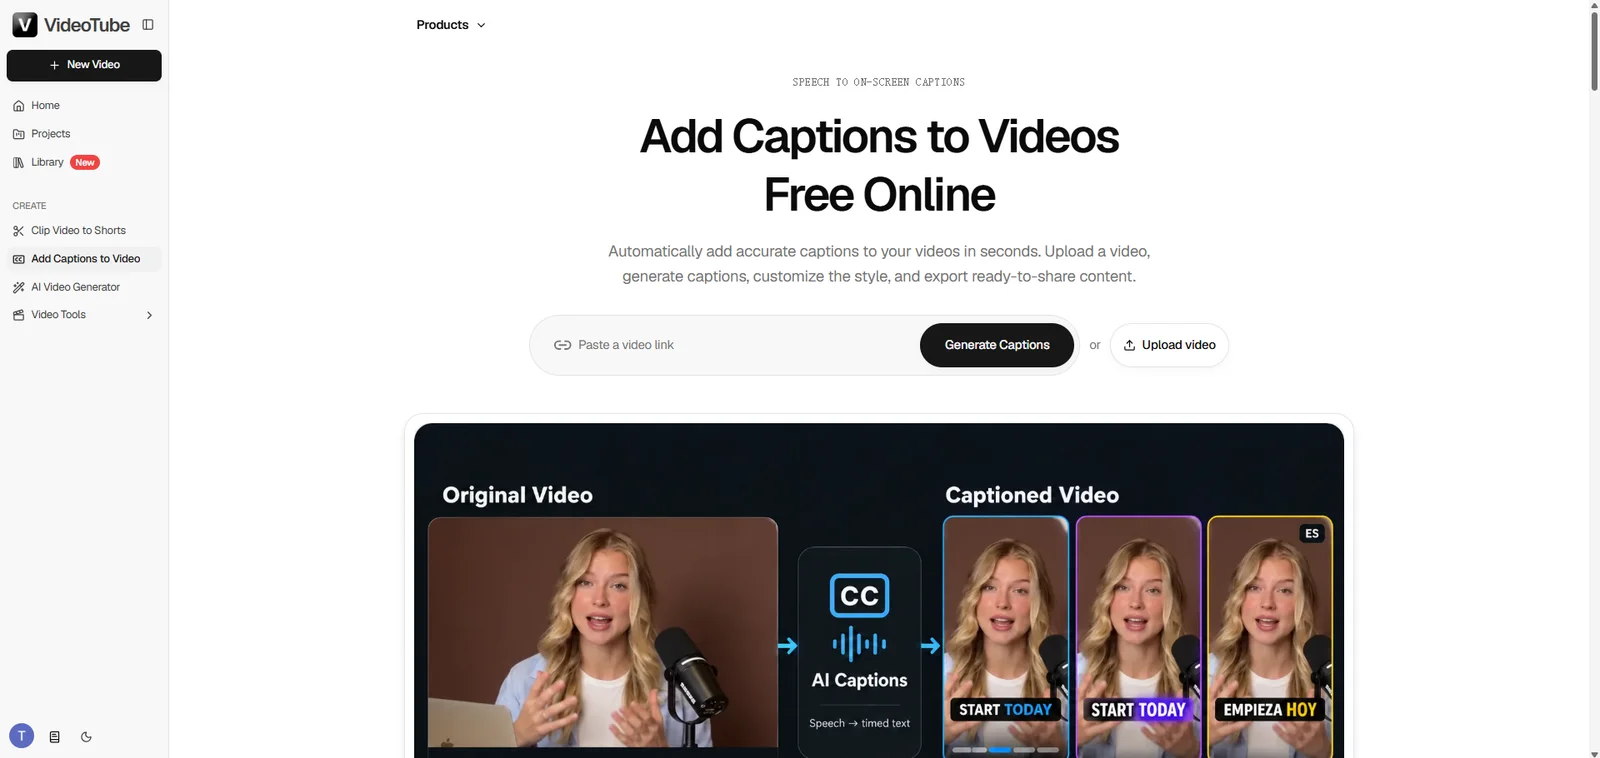
For a finished video that only needs captions, the video caption generator lets you add them without reopening the CapCut project. Bring in the file or a link, choose how the captions should look, check the generated words against the video, and export a captioned MP4.
Upload a Video or Paste a Link
Start with the video you want viewers to see. Upload the file or paste a supported link. Clear spoken audio gives the caption generator a better starting point.
Choose the Caption Language and Style
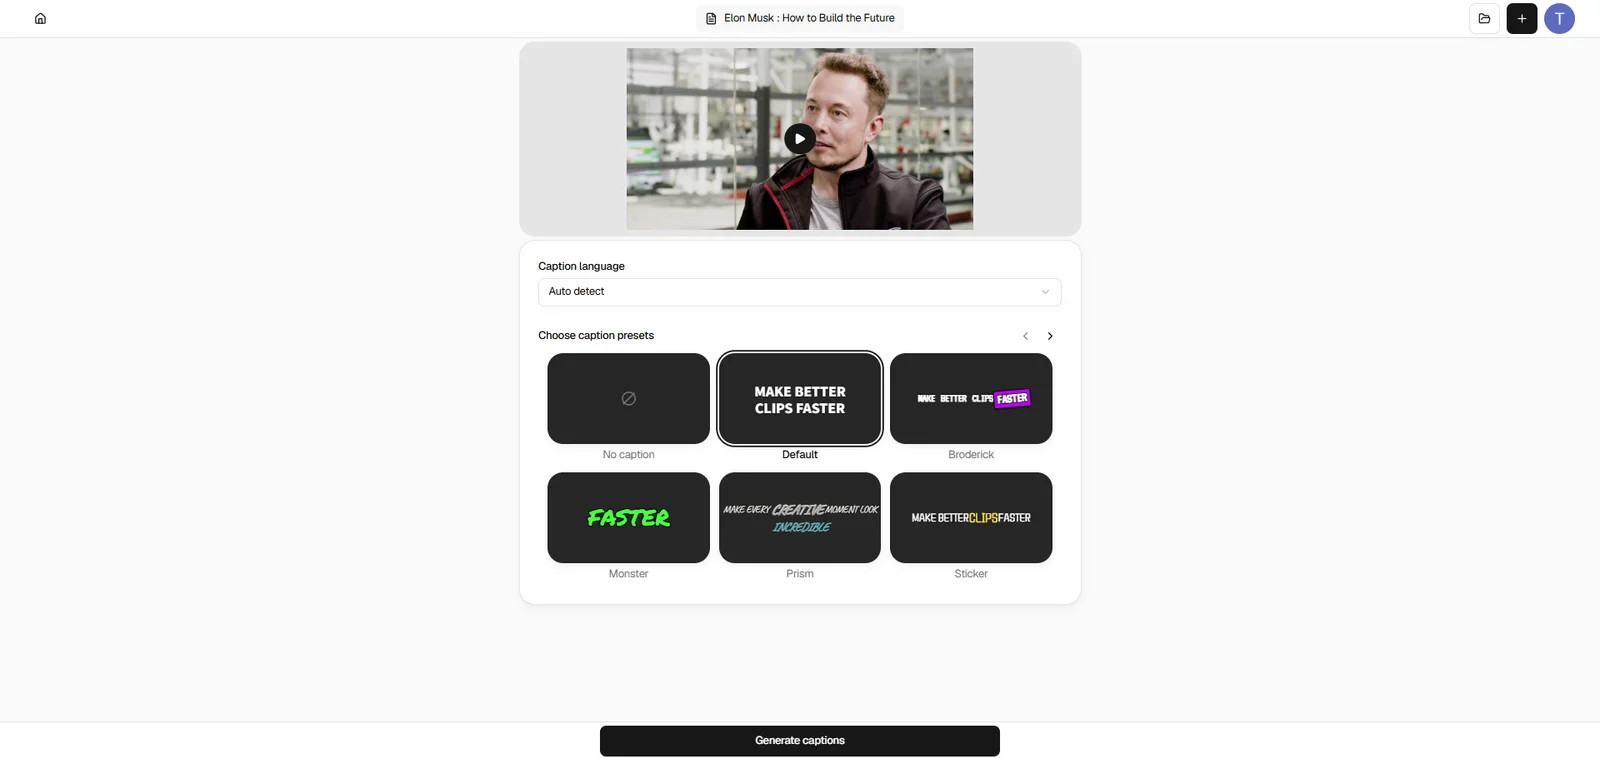
Choose the language spoken in the video, or select Auto detect to let the tool identify it. Pick a style from the examples shown before generating captions. You can change the style later in the editor.
Generate, Review, and Export the Captioned Video
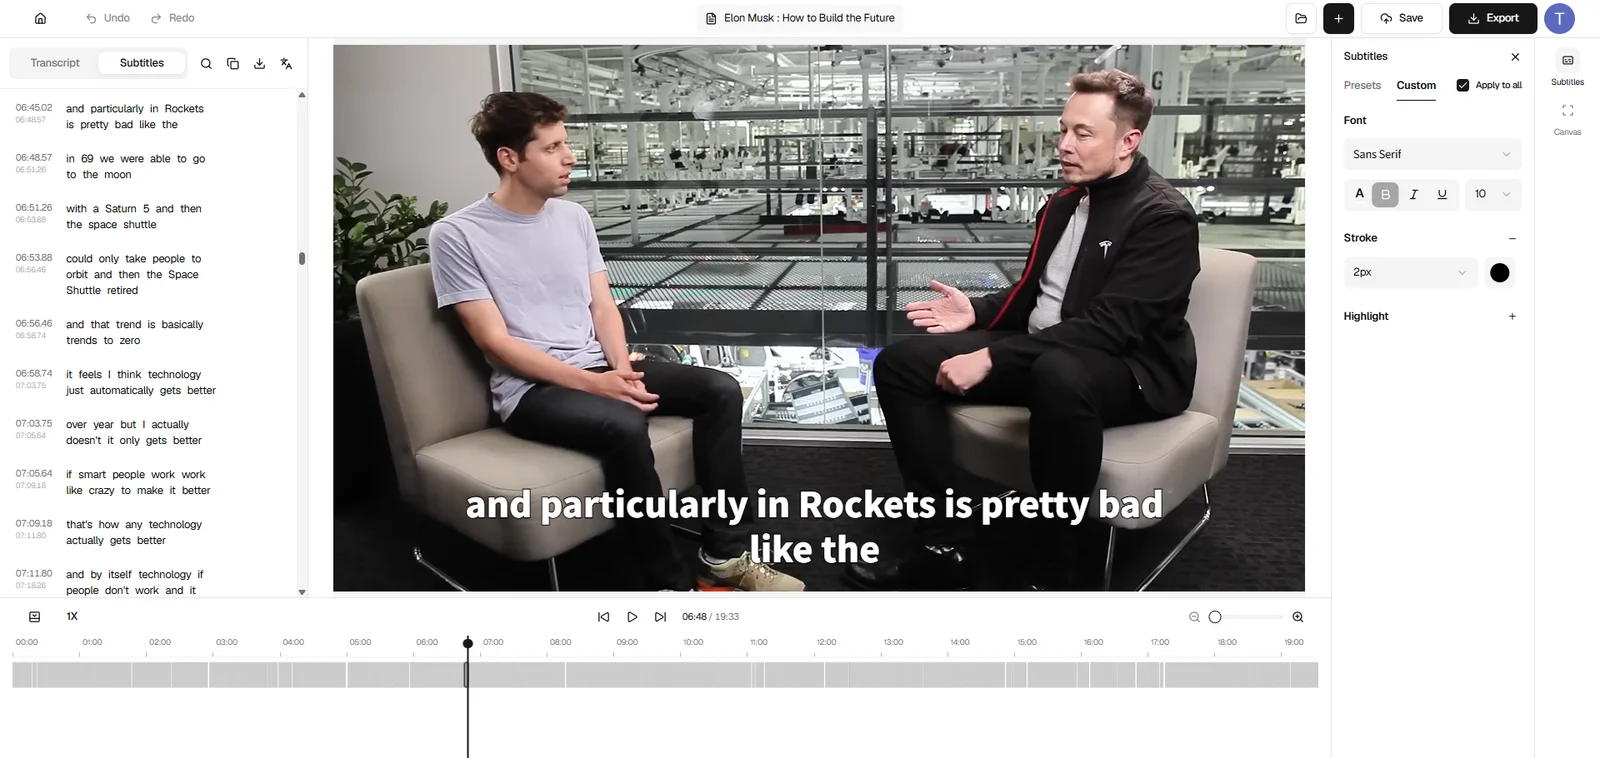
Generate the captions, then read each timed line in the subtitle list while watching the video preview. Correct names, numbers, and important phrases, and adjust the style if needed. When the video looks right, click Export MP4 to download it with captions on screen.
Final Checklist Before Sharing a Captioned Video
-
The selected caption language matches the speech.
-
Names, numbers, and key terms match the audio.
-
Each caption appears when the words are spoken.
-
Text stays readable over light and dark footage.
-
Captions do not hide essential action or on-screen details.
-
The exported video plays correctly with sound off.
CapCut Auto Captions FAQ
Are CapCut Auto Captions Free to Use?
CapCut may offer auto captions in its free editor, while some styles or uses may require a paid plan. Limits can vary by platform, region, and account. Check the options shown in your own editor before starting a project that depends on free captioning.
Can CapCut Translate Auto Captions into Another Language?
CapCut offers bilingual caption options on supported versions. Choose the spoken language and the target language, then review the translation carefully. Names, slang, and product terms often need a human check before you share the video with a new audience.
Can I Export CapCut Auto Captions as an SRT File?
Some CapCut versions provide a separate caption export, including SRT, while available options can vary by platform and version. Look for Caption Export rather than Video Export if you need a text-based subtitle file. An SRT file can be edited separately; it is different from text already visible in an exported video.
Can Auto Captions Work on a Video Without Spoken Audio?
Auto captions turn detectable speech into text. If the video has no spoken audio, there are no words for the tool to transcribe. Add text manually for silent footage, or record a voiceover first if spoken narration is part of the video you want to make.
Can I Edit Burned-In Captions After Exporting?
Not directly in the exported video. Burned-in captions are part of the picture. Open the original project, correct the caption there, and export the video again. If you need text that can be changed separately later, check whether your workflow supports a subtitle file such as SRT instead.